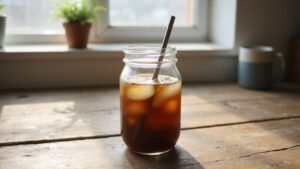
Wondering if you can safely freeze soup in glass mason jars? The answer is yes, provided you follow a few important steps.
Using wide-mouth jars and leaving enough space helps prevent cracks, and proper cooling avoids thermal shock. With the right technique, you can store your soup securely without mess or damage.
Here’s how to do it right.
Choose Freezer-Safe Mason Jars (and Avoid Breakage)
Make sure to select lids with silicone or foam liners when using freezer-safe mason jars. These liners ensure a tight seal at freezing temperatures, preventing moisture ingress and freezer burn. Metal lids without proper liners tend to fail, which can compromise the jar’s integrity and the safety of your food. Additionally, don’t tighten the lids fully until the soup has cooled down. Loosen them slightly to allow gases to escape as the contents settle, preventing pressure buildup that could cause the jar to crack or blow out. Choosing certified jars designed for freezing and using the correct lids helps prevent breakage and keeps your soup safe. For best results, use jars with straight edges and avoid those with curved shoulders to reduce the risk of breakage during the freezing process. Before filling, you can also run the jars through a hot water bath or dishwasher cycle using simple sterilization methods to ensure they are clean and safe. Even the best wood duck nesting boxes require careful selection of predator guards to ensure the survival of the hatchlings. When choosing your freezing containers, consider how a brooder box functions as an insulated, protective environment to understand the importance of temperature stability for food preservation.
Cool Your Soup Before Freezing It in Mason Jars
Cooling your soup completely to room temperature before freezing it in mason jars is crucial to prevent glass from cracking due to thermal shock. To speed up this cooling process without compromising the soup’s texture, use an ice bath. Fill a larger container with ice water and place the pot of hot soup inside, stirring gently to distribute heat evenly. This method helps cool the soup rapidly while avoiding large ice crystals that can form if cooled too slowly. Finding the right jars for freezing is also important to ensure they can withstand the process. Alternatively, you can refrigerate the soup in the pot for up to 24 hours before transferring it to jars for freezing. For long-term storage, consider choosing a well-ventilated coop to keep future chickens safe from ammonia buildup. Always leave the lids loose on jars until the soup is fully frozen. This allows air to escape as the liquid expands during freezing, preventing the jars from cracking or breaking. Once frozen, tighten the lids and store the jars in your freezer for safe, effective preservation. Proper temperature control at this stage ensures that your soup maintains its texture and quality when reheated. For homesteaders, a 2 gallon watering can can be repurposed as a convenient tool for cooling large batches of soup in an ice bath.
How Much Headspace for Freezing Soup in Glass Jars
When freezing soup in glass mason jars, you should leave about 1 to 1.5 inches of headspace. This space accommodates the 9 to 10 percent expansion of liquids as they freeze, preventing the jars from cracking or the lids from popping off. For pint-sized wide-mouth jars, use 1 inch of headspace, while quart-sized jars need about 1.5 inches. Straight-sided jars work best because rounded shoulders limit expansion room. If your soup is a thin broth or stock, increase the headspace to 2 inches for extra safety. Thicker stews or chili typically require only 1 inch of headspace. Always measure from the rim, not the thread line, to ensure accuracy. Avoid standard quart jars with high-water-content soups, as they are more prone to breakage. Adjust the headspace based on your soup’s water content and thickness; more liquid demands more room. For optimal freezer performance, consider using jars with straight sides for better expansion accommodation. Proper spacing helps your jars withstand freezer conditions without breaking. For a reliable build, consider using a step-by-step guide for sturdy storage solutions. You can reinforce the jars by attaching chicken wire to the wooden shelf for added stability.
Handle Lids the Right Way for Freezer Success
To handle lids the right way for freezer success, start by placing the flat lid disc on your jar without tightening the screw ring before freezing. This creates ventilation gaps of about 1/8 inch, which allow air to escape as the soup expands during freezing. Never tighten the ring until the soup is fully frozen, which typically takes at least 48 hours. Leaving this gap prevents pressure buildup and helps avoid cracked jars or broken seals. Additionally, leave at least 1 inch of space between jars to prevent lids from bumping and losing their seal. Once frozen, secure the ring tightly and label each jar with the soup name and date using freezer tape for clarity, ensuring easy identification later. Using new lids for each freeze is critical since lids are not reusable after canning due to seal compromise. Always position the jars on a flat surface in the freezer, similar to how a brooder for chicken provides a stable and safe environment for your flock.
Freeze Without Breakage: A 5-Step Checklist
First, select the right jars—use straight-sided, wide-mouth Mason jars. Glass with curved shoulders or tall, narrow shapes is more prone to cracking under temperature changes. Second, measure the headspace carefully, leaving 1 to 2 inches at the top to allow for expansion during freezing. Overfilling can cause the jar to break when the liquid expands. Third, ensure the soup is completely cooled before freezing. Let it reach room temperature and refrigerate overnight; never freeze hot soup, as the rapid temperature change increases the risk of breakage. Fourth, control the temperature to prevent thermal shock. Use cold jars for room-temperature soup and avoid placing hot jars directly into the freezer. This slow temperature transition helps maintain jar integrity. For a perfect fit, choose a jar size that matches the portion you plan to freeze. This method also preserves the jars by mimicking the gradual temperature shifts used in canning to avoid glass failure.
Fifth, arrange jars with space between them in the freezer. Proper airflow prevents contact and uneven freezing, which could stress the glass. Only tighten lids finger-wise—the lids should be loose during freezing—and seal tightly only after the soup is frozen. Also, confirm that your jars are labeled freezer-safe and have a consistent glass thickness. Discard any non-Mason jars, as they may not withstand the freezing process. Use an ice water bath for rapid cooling if refrigerator space is limited, as this method efficiently lowers soup temperature to prevent condensation and spoilage.
Thaw Frozen Soup Safely
To thaw your frozen soup safely, start by refrigerating it. A standard quart jar typically takes 36 to 48 hours to thaw completely in the fridge. For thicker soups, it may take up to 60 hours. Keeping the temperature below 40°F ensures the soup remains safe to eat and preserves its flavor and nutrients. If you’re short on time, submerge the sealed jar in cold water, changing the water every 30 minutes. This method generally takes 2 to 3 hours. Never use hot water, as the rapid temperature change can cause the glass to shatter. The microwave is another option: use the defrost setting and stir the soup every 30 seconds. Stop once ice crystals disappear. After thawing, reheat the soup to at least 165°F, stirring often. Consume within 3 to 4 days if you’re not planning to cook immediately. Using shallow containers for freezing can speed up this refrigerator thawing process. For best results when using jars, always ensure a proper seal is intact before freezing to prevent leaks and contamination. For homesteaders with irritated eyes, minimizing airborne irritants in the kitchen can also help reduce eye watering during food preparation. For optimal space management during thawing, consider the right height of your refrigerator shelves to accommodate tall quart jars without tipping.
Common Mistakes When Freezing Soup in Glass Jars
Freezing soup in glass mason jars requires careful attention to several key factors to prevent accidents. First, always leave proper headspace—at least 1 inch for jars with straight sides and 2 inches below curved shoulders—to allow for expansion. Failing to do this causes the glass to crack as the soup expands during freezing. Choosing a compost bin with similar material considerations can inform your choice of durable glassware.
Next, regulate the temperature carefully. Never pour hot soup directly into the jar; instead, cool it completely using an ice bath or by letting it sit at room temperature until it reaches room temperature. Pouring hot liquid into a cold glass jar creates thermal shock, which can cause the glass to shatter. Also, do not tighten the lids fully until the soup has frozen solid. Leave lids loosely placed to prevent pressure buildup as the liquid expands. Selecting jars with compatible lid sizes ensures a proper seal after thawing. For those using off-grid setups, a solar-powered fan can help maintain consistent temperatures in storage areas.
Avoid using tall, narrow jars or non-tempered glass containers, as these are more prone to breaking. When stacking or placing jars in the freezer, keep at least 1 inch of space between each jar to allow for even cooling and to minimize contact stress that could crack the glass. Following these steps ensures your jars stay intact and your soup remains safely frozen.