DIY PVC Chicken Feeder: A Step-by-Step Guide
Looking for a way to reduce feed waste and save money on chicken feed? A DIY PVC chicken feeder might be your answer, offering a simple, cost-effective solution that cuts waste by up to 70%.
With just a few supplies and some easy steps, you can build a feeder that keeps your hens happy and your feed protected.
Read on to learn how to create your own efficient DIY poultry feeder.
Why Build a PVC Chicken Feeder? Save Money and Reduce Waste
PVC pipe costs only $0.50 to $2.00 per foot, making it a highly affordable option for building chicken feeders. For a standard-sized feeder, you’ll typically spend between $10 and $20 on materials, which is significantly less than the over $100 often required for industrial metal feeders. This savings allows you to allocate funds elsewhere and build multiple feeders if needed. This design supports healthier and happier chickens by preventing stress over feed access. When storing grain in these feeders, using high-quality materials comparable to Top Vacuum Sealer Bags for Foodsaver Reviews can help maintain freshness and protect against moisture.
Using PVC also drastically reduces feed waste — by approximately 70%. Its sealed reservoir can hold about 25 pounds of feed, meaning you won’t need to refill it constantly. Plus, the sealed design prevents chickens from scratching out their rations, minimizing mess and overconsumption. Custom port angles help limit spillage to under 5%, further conserving feed. This level of efficiency means you can also invest in a quality chicken coop to provide a safe and comfortable home for your flock. For those who prioritize sustainability, choosing a well-reviewed compost bin can further reduce household waste alongside your feeder.
PVC’s smooth interior resists moisture and mold, providing an optimal environment for storing feed safely. Its non-corrosive, rodent-proof properties keep pests and pests from getting to your grain. Additionally, weather elements like rain, snow, and UV rays will not degrade PVC over a decade, ensuring your feeder lasts for many seasons. Overall, building with PVC means saving money, protecting your feed, and enjoying a durable, pest-resistant design.
Materials You’ll Need for a DIY PVC Feeder
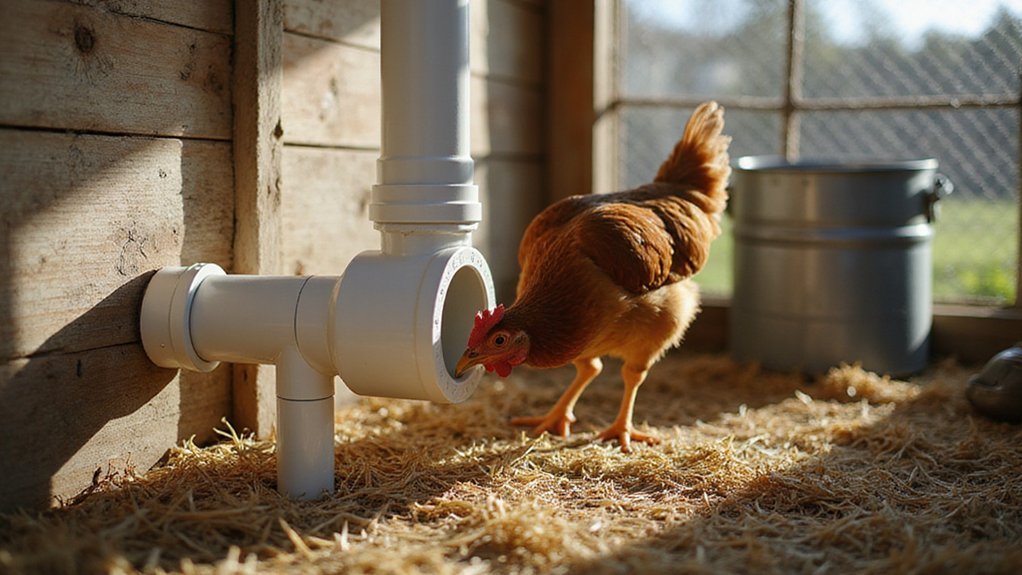
You’ll need several PVC pipe components to build your feeder. Start with a 2-inch diameter, 5-foot length of PVC pipe—this provides enough material for the main structure. Four end caps seal the pipe openings, while two 90-degree elbow joints help create the desired shape and access points. A Y connector allows for easy food flow management. For bonding, use PVC primer and cement to ensure a permanent hold. If you prefer a glass alternative, mason jars for salads can be used as durable feeders for smaller setups. Choosing a feeder that works well with your coop’s design will improve overall performance and value for your chickens.
Additional tools include sandpaper for smoothing cut edges and a hacksaw to cut the pipe to your required lengths. For mounting, gather a metal strap, 1/4-inch screws, washers, zip ties, and a drill to secure the feeder in place. To create dispensing holes, use 1/2-inch and 1/4-inch drill bits. A funnel and scoop are helpful for filling, making the process less messy.
Protect your feeder from pests and weather by adding a night cap to block critters and a weather shield to keep the feed dry. For finishing touches and safe edges, use a heat gun or file to smooth sharp points. These materials and tools will set you up for a successful DIY PVC feeder. For further setup, consider that proper roosting bar height varies by chicken breed and coop design.
Cut and Sand Your PVC Feeder Pipe for a Clean Edge
To ensure a clean edge on your PVC feeder pipe, cut and sand your 3-inch PVC pipe carefully. Measure and mark the pipe at 2.5-foot intervals to create four equal sections. Use a tape measure or a permanent marker to ensure each cut is perpendicular to the pipe’s axis, which helps maintain a straight, even edge. For cutting, a hacksaw with fine teeth works best because it reduces chipping and provides a smooth cut. Always secure the pipe in a vise to stabilize it, wear safety goggles to protect your eyes, and apply slow, steady pressure to avoid jagged edges. Cut just before the pipe separates to keep the edges smooth and uniform. Similar to the precision required for a solar watering can, careful measurement ensures efficient water distribution in your garden.
After cutting, use a metal file to deburr any rough, sharp edges that could harm your birds. Next, sand both the inner and outer surfaces with fine-grit sandpaper, moving in a circular motion. This step smooths out rough areas and prevents splinters or sharp protrusions. Finally, wipe the pipe with a clean cloth to remove all PVC dust, which is important to prevent your chickens from ingesting harmful particles. Proper cutting and sanding ensure your PVC feeder is safe, clean, and durable. For a reliable waste recycling setup in your coop, consider using a top compost tumbler to manage organic materials effectively. For a more comprehensive garden project, a raised bed garden kit can provide a structured space to complement your feeder setup.
Dry-Fit the Elbows First to Check Feed Flow Direction
Dry-fitting the elbows first confirms the feed flow direction and ensures proper alignment before applying any glue. This step allows you to verify that each 90-degree or 45-degree fitting faces exactly where it should. Without glue, you can easily rotate and adjust the elbows to confirm the feed path reaches the tray without kinks or blockages. Checking the flow at this stage prevents you from gluing an elbow backward, which could trap feed and disrupt the system. You should also verify that the pipe bottoms out fully in the socket with no gap, and mark the insertion depth for accuracy. For wood duck boxes, similar dry-fitting is used to confirm proper drainage angles before final assembly. Skipping this step can lead to misaligned elbows that require rework, wasting time and materials. Dry-fitting helps optimize chicken access and reduces waste by allowing correction before cementing. Homesteaders often apply this same principle to seasonal lighting setups to avoid misalignment during installation. The same principle applies when testing trellis support angles for raised garden beds to ensure stable alignment prior to fastening.
Step-by-Step Guide to Gluing Your PVC Feeder Joints
Once you’ve dry-fitted and confirmed the feed flow direction, you can proceed to glue the joints for a permanent, leak-proof connection. Start by preparing the surfaces: cut the PVC pipe square with a fine-tooth saw or pipe cutter, then remove any burrs with a deburring tool or utility knife. Wipe away dirt, dust, and moisture to ensure a clean bond. Sand burrs with 80 grit paper to prevent snags, clogs, or damaged joints, making sure burrs are removed from both inside and outside of the cut pipe. A similar surface preparation is used when installing a rain barrel spigot to ensure a tight seal.
Apply purple primer evenly to both the pipe end and the inside of the fitting socket, covering all exposed PVC surfaces until they look dull. This step prepares the plastic for a strong chemical weld. While the primer is still wet, brush an even coat of cement onto the pipe and a lighter layer inside the fitting. Immediately insert the pipe fully into the fitting socket, twisting it a quarter turn to distribute the cement evenly. For maximum structural integrity, follow the same joint preparation standards used in top-rated ghost with chicken wire reviews.
Hold the joint steady for 15 to 30 seconds to prevent push-back or separation. Wipe away any excess cement from around the joint with a rag. Set the assembly aside to cure in a well-ventilated area with no movement. Remember that the cement typically takes about four hours to fully cure and reach maximum strength, so avoid disturbing the joint until then. Always wear gloves and work in a ventilated space to stay safe during the gluing process. For environmentally conscious builders, choosing certified compostable bags for cleanup helps reduce waste alongside your durable PVC project.
Mount the PVC Feeder at the Right Height for Your Chickens
To ensure your PVC feeder is mounted at the correct height, measure the back level of your smallest chicken. For a standard breed, position the feeding port about 10 to 14 inches above the ground. This height allows the smallest bird to comfortably access feed without competition from larger chickens, reducing feed waste and preventing the feed from scratching onto the ground. Any spilled or spoiled feed can be collected and added to a kitchen compost bin to further minimize waste. Homesteaders often require the biggest watering can to efficiently hydrate large flocks and gardens. Mount the feeder on a sturdy post within the run, taking care to avoid gaps or footholds that raccoons or rats could exploit for entry. When working near the fence, emphasize predator-proofing by sealing potential access points. For larger breeds like Jersey Giants, raise the feeding port to 16 to 18 inches. Regularly re-measure after your flock grows to maintain fair access and minimize waste. Ensure the feeder swings perpendicularly to discourage chickens from roosting on it. Using a vacuum sealer on feed bags can extend their freshness, but for best results you should always choose the best vacuum sealer bags to prevent punctures from the PVC edges.
Secure the Feeder to a Wall or Post With Metal Straps
To secure the PVC feeder to a wall or post, use metal straps that are at least 10 feet long. This length provides enough flexibility for you to make adjustments during installation. First, attach a 1-foot-long scrap wood piece to the wall, positioned 3 inches below the desired feeder height. This supports stability and keeps the feeder cap accessible. Elevating the feeder increases sanitation by keeping the equipment off the ground.
Next, work with a partner: one holds the feeder steady, while the other drives 1/4-inch screws through the galvanized metal straps into the wall or post. Use 3/4-inch galvanized steel strapping for weather resistance, ensuring tight enough to prevent slipping but not so tight as to damage the pipe. After securing the straps, loosen one screw to fine-tune the height or levelness, then re-tighten for a permanent hold. Allow the setup to sit for 24 hours before filling with feed to ensure stability.
Fill and Load Feed Into Your PVC Feeder
To load feed into your PVC feeder without creating a mess, start by using a funnel to pour pellets or crumbles into the top opening. Fill until you’re about 2 to 3 inches below the rim to allow for proper air circulation, which helps prevent moisture buildup. Pellets or crumbles flow more smoothly than whole grains, reducing the risk of clogging inside the narrow pipe. Once the feeder is filled, immediately seal it with its lid or cap to keep out moisture, pests, and contaminants. This step is essential for maintaining poultry health and keeping feed fresh. Scratch-type feed is preferred over pellets in these feeders to ensure consistent flow and reduce clogging. A similar principle of consistent airflow applies to solar dehydrators to prevent mold growth during drying. For additional protection, consider encasing the feeder in chicken wire to prevent larger pests from gnawing on the PVC.
Good maintenance begins with the flow rate. Observe the first few chickens feeding; if the feed doesn’t drop into the port, you may need to adjust the port size or slightly lift the feeder to improve gravity flow. Making these small adjustments helps prevent waste and ensures your flock gets a steady supply of feed without constant refilling.
Watch for Spillage and Rodents in the Feeder’s First 24 Hours
After feeding your flock for the first few minutes, closely monitor for spillage and rodent activity within the first 24 hours. Expect feed to begin accumulating at the base wye within two hours, especially if your tube is under 8 inches in diameter, as chickens tend to sling 15–25% of the loaded feed out. By six hours, this spill can create a 4 to 6-inch pile around the feeder’s base, which attracts rats that can detect open feed within a day.
An unsecured top cap significantly increases the chance of rodent entry, with about 90% of attempts succeeding when the cap is loose. Overnight, an open tube can allow 3 to 5 mice to access and consume feed. To prevent pests, securing the feeder on a T-post can reduce spill by around 30%. Always lock the cap at night to prevent 95% of rodent entry and avoid leaving it loose to prevent moisture from rain, which can lead to mold growth on stored feed.
Fix Feed Spillage and Access Issues Quickly
To quickly fix spillage and access issues, start by optimizing your port size. Reduce the opening to 1.5 inches if pellets tend to spill, or enlarge it to 2.5 inches if crumbles won’t flow smoothly. For spillage prevention, add a 0.5-inch lip to catch falling feed, which keeps your area cleaner. Next, adjust the feeder height based on your chickens’ needs: mount it 6 inches off the ground for easier, cleaner access, but lower it to 2 inches if they struggle to reach the feed. To improve weather resistance, angle the port slightly upward in a concave shape and face it away from the wind so that rain and wind don’t interfere with feed flow. Use a 3-inch diameter pipe for balanced feed flow and make sure to seal all joints with PVC cement to prevent leaks. After any adjustments, run a test for 10 minutes to see if issues are resolved. Regularly clean the interior weekly to maintain feed quality and keep problems from reoccurring. These simple steps help solve most spillage and access issues fast and keep your feeder working efficiently. Alternatively, a feed catcher solution installed beneath the feeder can capture up to 400g of spilled feed daily, preventing waste from scattering and attracting pests.