Cutting chicken wire might seem straightforward, but it can be tricky to do safely without injuries. The key is using the right tools and protective gear while keeping your workspace secure.
Whether you’re trimming thin or thick wire, knowing how to cut it properly protects you from sharp edges and flying fragments. The details below will show you how to do this safely and effectively.
What Safety Gear Do You Need for Cutting Chicken Wire?
Your eyes need protection. Flying wire fragments can easily strike at high speeds, so you must wear safety glasses with side shields or goggles with indirect vents. If you are doing significant cutting, add a face shield over your glasses for extra full-face coverage. Always select eyewear rated to ANSI Z87.1 standards with anti-scratch lenses. This ensures your vision remains clear and your eyes stay safe from flying debris during cutting. With your eyes protected, you can focus on finishing your task safely. Additionally, wear heavy-duty work gloves to prevent cuts and punctures from sharp wire edges. For those building a habitat like a wood duck nesting box, similar precautions apply to avoid wire injuries. Choosing pressure treated lumber for the frame also helps prevent rot from moisture in the coop environment. Positioning your roosting bars at the appropriate height ensures birds can perch comfortably without injury.
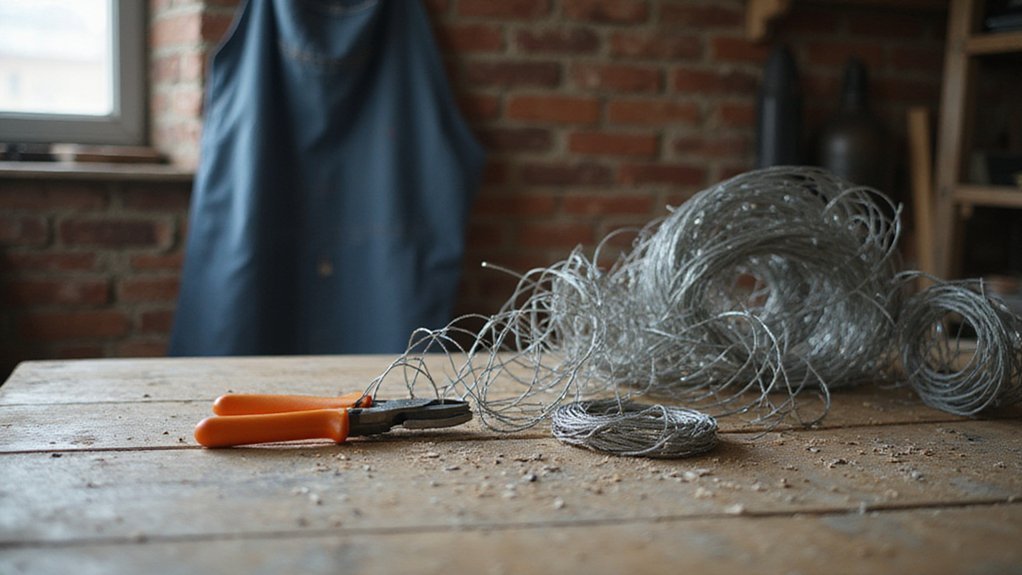
Choose the Right Tool for Cutting Chicken Wire by Thickness
The right tool for cutting chicken wire depends on its thickness. For wire up to 0.21mm, standard scissors are ideal because they offer precision, allowing you to make detailed cuts. However, they will only cut one strand at a time, which can be slow if you need to trim larger sections. For medium wire between 0.21mm and 1.2mm, use wire cutters or tin snips. Wire cutters provide good leverage and make it easier to cut through individual strands, while tin snips can handle multiple strands at once, speeding up the process. For heavier wire above 1.2mm, switch to power tools like an angle grinder or heavy-duty anvil snips. Manual tools simply aren’t built to handle such thickness without risking damage to the tool or compromised safety. Always keep your blades sharp and well-maintained; dull tools require more force, increasing the risk of injury and damaging the wire or tool. Matching the tool to the wire thickness ensures safe, efficient cuts without damaging the mesh. When selecting a cover for your raised bed, consider the best cover for raised garden beds to match material to your specific needs. Before cutting, accurate measurement of the wire is crucial to reduce waste. For those managing larger birds, choosing the correct tool is essential when building or modifying large chicken coops. Additionally, for the water supply in your coop, consider the best nipple choices for chicken waterers to ensure clean hydration for your flock.
Measure and Mark Your Chicken Wire for a Straight Cut
To measure and mark your chicken wire for a straight cut, start by determining the exact dimensions needed for your project. Use a tape measure to record the length and height of the area where you’ll install the wire, making sure to note measurements in inches. Add an extra 4 to 6 inches to the total length to allow for overlaps and adjustments during installation. Double-check all measurements to avoid wasting material; precision here is essential to ensure a clean, straight cut. For livestock enclosures, cutting hardware cloth with aviation snips works well for durability. Many homesteaders reuse materials like egg cartons for starting seedlings rather than discarding them. When measuring for larger projects, a 2 gallon watering can is useful for evenly dampening the wire to reduce dust and static during handling.
Next, for accurate marking, select a permanent marker or chalk. Use a ruler or straight edge to draw a clear, straight line along the surface of the mesh. Keep the line aligned with the wire junctions, not through the middle of hexagons—this maintains the integrity of the mesh and minimizes sharp edges after cutting. To guide your cutter and prevent fraying, apply masking tape along the marked line before cutting. This technique is useful for preventing snapping during installation as it helps maintain the mesh’s integrity. Secure the wire flat and taut, then run your gloved hand over the line to verify its visibility and straightness. Finally, inspect your markings under good lighting to confirm they are fully visible before proceeding.
Keep Your Chicken Wire Flat for an Accurate Cut
To keep your chicken wire flat for an accurate cut, work on a completely level flat surface. Verify ground flatness with a spirit level, filling any low spots with soil or sand to ensure evenness. Clear away all debris that could cause the wire to lift or deform. Use a long board or a heavy roller to apply pressure along the entire length of the wire, ensuring it stays flat. For easier handling, consider using one of the top compost tumblers designed for efficient mixing. If you need to move the wheelbarrow with the wire, ensure the wheelbarrow tires are properly inflated for stability. Smooth the wire with your hands or gloves to eliminate gaps underneath. Gently roll the wire in the opposite direction to straighten the wire and address any kinks during unrolling. Maintaining a flat surface prevents the wire from curling during cutting, which improves accuracy and enhances safety by ensuring better control over the mesh. Choosing top chicken coop options can also help you plan a safer enclosure overall.
Cutting Techniques for Clean, Controlled Edges
To achieve clean, controlled edges, you need to select the appropriate cutting tool and prepare carefully. Use tin snips for precision cuts or heavy-duty cutters if speed is your priority, always choosing the tool based on your wire gauge. Mark your cutting line clearly with a marker or chalk, ensuring it runs parallel to the hexagonal pattern for accuracy. Stabilize the mesh using clamps or weights to maintain wire tension; this prevents the mesh from springing away and helps keep your line straight. When cutting, hold the tool at about a 90-degree angle to the wire and make short, light strokes to control the cut. Always cut away from your body to ensure safety. After each cut, immediately use pliers to fold down any sharp protrusions, creating a smooth, safe edge and preventing injuries. Following these steps guarantees a precise cut without jagged or uneven edges.
Cut Strand by Strand for Precision and Control
Cutting wire strand by strand gives you greater control and precision. This method allows you to make each cut carefully, preventing sudden tension releases that could distort your mesh. By managing wire tension effectively, you keep the mesh flat and stable, avoiding kinks and warping. Adjusting your cutting angle with each snip produces clean, even edges. Holding the wire firmly behind the cut stabilizes the mesh and minimizes movement, while maintaining slight tension on the uncut section prevents strands from slipping. Keep your guide hand at a safe distance to avoid injury and stay clear of moving cutters. Using incremental cuts also helps keep your marked line visible, ensuring accuracy throughout the process. Additionally, this technique reduces flying shards and glove punctures, making the task safer and cleaner. Starting at an edge provides better stability, resulting in precise, controlled cuts every time. Holding the wire upside down improves your grip and leverage when making each snip. This approach also allows you to maintain consistent tension while shaping the chicken wire ghost form without damaging the structure.
Bend Sharp Ends Down After Cutting Chicken Wire
After cutting the chicken wire, bending the sharp ends down is crucial for safety and a neat finish. Use heavy-duty pliers to grasp each point firmly. Bend the protruding wire back toward the mesh at a 45-degree angle, then fold it flat against the wire. This process reduces the risk of skin punctures, scratches, and eye injuries from flying fragments. It also helps prevent tearing of livestock or pet pads, and protects clothing and hands from scrapes and punctures. For a smoother and more precise folding technique, consider using a watering can long spout to guide the wire into position. This method is especially useful when assembling a worm compost bin to ensure no sharp edges damage the bedding or harm the worms. Homesteaders value this folding technique because it maintains the easy pour functionality of nearby watering equipment by preventing debris buildup.
Always wear leather gloves and safety glasses to protect yourself during this step. Overlap the folded end by at least 0.5 inches to ensure stability and prevent it from unraveling. Carefully inspect every cut edge to confirm no exposed points remain. Skipping this step can lead to injuries and compromise the longevity of your project, so take a moment to do it thoroughly. Properly folded ends also minimize moisture and debris buildup, preventing wire corrosion over time.
Check for Hidden Dangers Before Handling Cut Wire
Hidden dangers can still lurk after cutting wire. Carefully inspect all cut ends for pre-existing sharp protrusions caused by manufacturing, especially around hexagonal junctions. These tiny points can cut skin even if they aren’t visibly sharp or uncut. Wearing gloves helps reveal these hazards so you can handle the wire safely.
Hidden tension in the roll poses a serious risk. When released, strands can snap violently, potentially causing injury or launching fragments several feet away. Always measure the tension levels before starting work, and secure the wire immediately to prevent sudden release.
Corrosion is another hidden danger. Rust weakens the wire and creates unpredictable breakage points that produce jagged fragments. Look closely for signs of rust or pitting, and avoid using corroded wire to prevent fractures and injuries. Overlapping layers can trap strands, increasing the chance they will break unexpectedly. Estimating the cost of soil for a raised bed can help you budget for replacing compromised wire with new materials.
Environmental hazards also affect safety. High winds can shift or move the wire, reducing control and increasing the risk of injury. Wet surfaces make handling more slippery and difficult, while prolonged sunlight may degrade protective coatings, weakening the wire further. Always assess these conditions before beginning work to avoid accidents. Choosing the right galvanized steel mesh can significantly reduce the risk of rust-related failures. For safer handling, consider using a dedicated brooder box for chicken instead of relying on cut wire.
Clean Up Scraps and Store Your Cut Wire Safely
To prevent injuries and maintain a safe workspace, always gather and properly dispose of your cut wire scraps immediately after cutting. Use a magnet or heavy gloves to pick up tiny fragments and avoid leaving them scattered around. Do not toss scraps in your regular trash; instead, seal them in a thick cardboard box or a metal can labeled “sharp wire.” This prevents accidental injuries for you and sanitation workers during disposal. For long-term food storage projects, consider using a vacuum sealer to preserve items in sealed mason jars.
Store your cut wire safely by rolling it tightly and securing it with tape or zip ties. Keep it off the floor by hanging it on a wall hook or placing it in a locked cabinet. Never leave loose coils where children or pets can access them. Taking these extra precautions and investing just a few minutes ensures your workspace stays safe and cuts are prevented later.
Test Your Cut Edge for Secure Attachment to Posts
To ensure the cut edge of your chicken wire is safe for attachment, first test it for sharp protrusions. Run a gloved hand along the edge to feel for wire ends sticking out beyond the hexagonal pattern. Mark each sharp spot with a visible marker. Use heavy-duty pliers to fold those ends flat against the mesh, twisting them tightly around adjacent wires to eliminate loose tips. This step ensures there are no dangerous points that could cause injury or damage during installation. Confirming the absence of protrusions creates a smoother, safer interface for attaching the wire to posts. When attaching the wire, pulling it evenly helps maintain a taut surface during installation.
Next, press the corrected edge against a wooden post to check for roughness or gaps. The edge should lie flush without any bulges or spaces, ensuring a clean fit. Verify that the wire remains taut when stretched between posts; flat ends help prevent slipping during stapling or tying. Finally, examine the cut line to ensure the hexagonal pattern stays intact and won’t unravel over time. A properly finished edge guarantees a secure, reliable attachment and contributes to the overall structural integrity of your fencing or enclosure.