Looking to build a raised garden bed without breaking the bank? You can do it for around $20 by swapping out pricey lumber for concrete blocks and scrap wood.
Filling it with yard waste like logs and wood chips can also cut your soil costs significantly.
Keep reading to see a simple step-by-step plan to create your affordable garden bed.
How a Budget Raised Garden Bed Saves You Money From Day One
Using Hugelkultur, piling logs and yard waste at the bottom of your garden bed can replace up to 65 percent of pricey soil with free, recycled materials. This method saves you between $100 and $200 per bed right from the start. Buying soil by the cubic yard in bulk can cut soil costs by about half compared to bagged soil. Starting a compost heap now provides free nutrient-rich soil for next season, further reducing expenses. You can even transform trash cans into compost bins to speed up this process and recycle household waste. For the best results, consider using top compost tumblers to accelerate decomposition and produce rich compost even faster. Raised beds are designed to target roots efficiently, using less water and lowering irrigation bills. Plus, the warmer soil temperature speeds up plant growth and accelerates harvest times. The improved soil structure and air circulation also naturally help control pests, reducing the need for chemical sprays. For additional protection, you can line the bed with hardware cloth to keep burrowing pests out. Overall, a raised garden bed can pay for itself within just one growing season through savings on inputs and increased productivity.
Pick a Cheap Layout for Your Space
The cheapest layout for your space depends on what materials and shapes you already have. For beginners, a simple 4×8 rectangular bed is cost-effective because it uses standard lumber and provides straight rows that are easy to plant in. If you have old tires, stacking them into a circular shape creates a compact planting area that also helps with pest control by disrupting pest patterns. L-shaped layouts fit into corners, making the most of small or cramped yards without adding to your expenses. For vertical gardening, tiered cinder-block beds are inexpensive and allow you to stagger planting heights, maximizing space. Choosing to skip painting the wood saves money, since paint is optional mainly for aesthetic reasons. Modular boxes are flexible and can be rearranged as needed, making them a budget-friendly option. Each of these layouts ensures high soil access and minimizes pests, letting you build a functional garden on a budget without sacrificing practicality. For a durable structure that also protects your investment, consider using materials similar to those in top chicken coops for weather resistance. Additionally, integrating a compost bin with worms into your garden setup can naturally enrich the soil and reduce waste. When designing your layout, keep your chickens’ roosting bar height in mind to prevent them from perching on or damaging your raised beds.
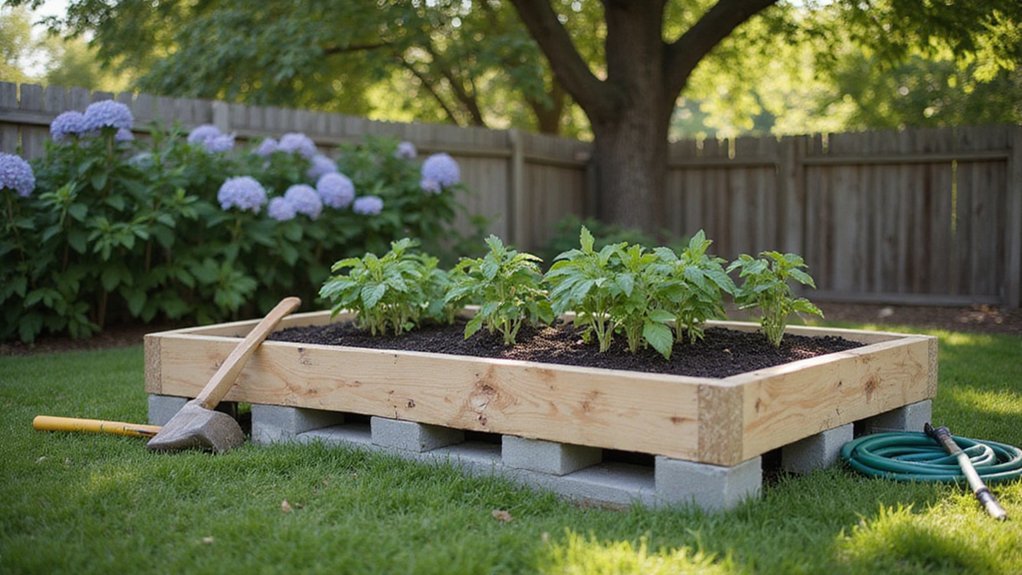
The $100 Material List: Concrete Blocks, Scrap Wood, and Burlap
A 4×8 raised bed costs about $58 with the materials listed. This size offers ample planting space while keeping expenses low, fitting well within a $100 budget. The core costs include concrete blocks for the structure, scrap wood for framing, and burlap to prevent weeds. Concrete blocks are particularly economical at $7.50 for six and can be stacked three high at each corner for stability, resulting in a total of 24-inch supports. Scrap wood framing costs around $10.50 for eight 2×6 boards, which are pre-drilled with 2.5-inch exterior screws to ensure durability. Burlap fabric at $3 for 12 inches lines the bottom, effectively blocking weeds without adding significant cost. To secure the structure, rebar anchor points driven six inches into the ground with a rubber mallet stabilize the first layer of blocks. Additional techniques like excavating three inches of soil under the blocks for level seating, using a plastic liner inside the frame, and mixing two parts topsoil with one part compost increase efficiency and plant health. For enriching the soil mix, you can also add spent coffee grounds to boost nitrogen levels and improve texture. Concrete blocks offer a highly durable foundation that can potentially last decades in a garden. For a more natural appearance, consider cedar or redwood for the frame, as these woods are naturally rot-resistant and can extend the bed’s lifespan. For smaller garden projects, you can apply a similar principle to a chicken nesting box by repurposing scrap wood and budgeting under $10 per unit. Overall, this approach leaves you with around $42 in your budget for any additional adjustments or materials.
Mark, Dig, and Level Your 4×4 Foot Area
To mark a 4×4 foot area accurately, start by driving stakes at each corner of the boundary. Connect these stakes with string to outline the perimeter precisely. Use a pointed stick to trace along the string and mark the outline on the ground. For measurement accuracy, double-check each corner’s distance with a tape measure to ensure the area measures exactly 4 feet by 4 feet. To make the outline semi-permanent, fill it in with lime or sprinkle sand within the lines, which makes it easier to identify during digging. Mark corner locations with wood shims or paint sticks for precise boundaries. Now, dig inside that line, removing all vegetation and roots with a spade. Slice the grass into strips and pile them on a tarp for disposal or composting. For effective composting, review compost bin reviews to select the best bin for your organic waste. If you plan to use bags for collecting kitchen scraps, look for certified compostable bags that are compatible with your chosen bin. Dig to a depth of 4 to 6 inches to fully remove the existing grass and roots. Next, loosen the soil below by shoveling down 8 to 12 inches, breaking up clumps to improve aeration and root penetration. Clear out stones and debris as you work. Enrich the soil by adding 2 to 3 inches of compost over the cleared area. Finally, use a rake to level the ground, redistributing soil from higher to lower spots. Check the leveling with a straightedge or a level placed diagonally across the bed. Adjust by removing or adding soil until the surface is flat and ready for planting. For gardeners also interested in wildlife, wood duck nesting boxes can be placed nearby to attract cavity-nesting birds to your property.
Anchor the Frame Cheaply Without Concrete
You can anchor the frame cheaply without concrete by using wooden stakes. Drill a hole through each stake and the bed, then insert a flat 2×4 into a 6-inch side hole in the stake. Screw the stake and 2×4 together once in place. Pack dirt around the stake to hold it steady. This method replaces the need for concrete, saving time and money. For a similar aesthetic approach, you might also explore vintage ceramic watering cans that combine durability with old-fashioned charm. Properly sealed lids prevent moisture from ruining the stakes just as they preserve food in storage for long-term homestead use. For optimal durability, the nesting box depth should match the stake’s diameter to prevent warping.
For basic stability using weight, place concrete blocks at each corner of the frame, positioning them just above soil level. Ensure the blocks are level to provide even support. No mortar or mixing is necessary—just heavy-duty blocks to counteract soil pressure and keep your frame secure. An alternative hack uses ½ inch rebar hammered into the ground through the center holes of planter wall blocks, which can then be paired with ½ inch EMT conduit for an all-in-one foundational anchor.
Skip Expensive Fabric: Use Old Carpet for Weeds
Old carpet, especially when repurposed from previous uses, can work better than expensive landscape fabric for weed control. It creates a solid physical barrier that blocks sunlight, which is essential for weed germination. Natural fibers like polyester or nylon in the carpet can last over a decade without negatively impacting your soil, making it a cost-effective and durable choice. The porous nature of the material allows water to drain through while retaining moisture necessary for plant roots. Homesteaders can save money by using this repurposed material instead of purchasing commercial barriers.
For geothermal spacing, position the carpet with the nap side facing down to maximize soil contact and enhance weed suppression. Overlap the edges by at least 1 foot to prevent weeds from slipping through gaps. Follow a step-by-step guide when laying the carpet to ensure proper overlap and staking. Secure the carpet with 9-inch metal stakes every 3 feet along the edges and at overlaps. This method ensures the barrier stays in place during weather changes and prevents weeds from finding gaps.
Additionally, using old carpet can aid in pest management by preventing invasive root systems from surrounding trees from encroaching into your garden beds. Before laying the carpet, clear the ground thoroughly to remove existing weeds and debris. Then, add a 4-inch layer of wood chips on top to improve soil health and provide a natural look. For even better results, pair this barrier with a raised garden bed with compost to enrich the soil and boost plant growth. Be sure to avoid wet or rubber-backed carpets that might contain toxins, as these could harm your plants or soil quality over time.
Build the Frame With Concrete Blocks and Scrap Wood
To build a sturdy, budget-friendly raised bed frame, use concrete blocks and scrap wood instead of pre-cut lumber kits. Start by selecting a flat, sunny spot and leveling the ground thoroughly. Remove grass by smothering it with soaked cardboard, then spread 1 to 2 inches of gravel and compact it with a hand tamper. Arrange your concrete blocks tightly in your desired bed dimensions, ensuring there are no gaps. Use a mallet to adjust their positions and check the level with a vial. For added stability, apply Loctite construction adhesive between layers of blocks. To finish the top border, cut scrap 2×6 boards to match your frame’s size. Place each board just below the top of the concrete blocks and screw them into place every 12 inches. This solid frame prevents shifting and provides a clean barrier against ground-level pests, making your soil testing more accurate and your garden more protected. Concrete blocks offer longevity, lasting beyond a human lifespan, which justifies their use over wood for long-term projects.
Fill Your Bed With Cheap Wood Chips and Compost
Fill your bed with layers of cheap wood chips and compost instead of expensive topsoil. Begin by stacking large logs and branches at the bottom to create permanent air pockets, which promote drainage and aeration. Cover this layer with a single sheet of corrugated cardboard to suppress weeds while allowing for water infiltration. Over the cardboard, add a 2–3 inch layer of nitrogen-rich material such as dried leaves or straw, and dampen it thoroughly to encourage decomposition. This layer balances the high-carbon wood materials below. For the top 8 inches, use a mixture of high-quality topsoil blended with 10–20% compost to provide essential nutrients for planting. Always test the soil before planting to ensure proper nutrient levels. For efficient watering, consider using a tool that offers practical guidance on moisture management. Using this layered approach with inexpensive materials helps you build rich, fertile soil without overspending. For gentle and precise irrigation, a bonsai watering can delivers a soft stream that won’t disturb the soil surface. Just remember, avoid mixing wood directly into the planting zone to prevent nitrogen depletion. A 7-year-old load of composted wood chips holds moisture well and can be used directly in the bottom layers to further reduce costs.
How to Add Cheap Fertilizer and Mulch for Strong Growth
Homemade fertilizers from your kitchen are a cost-effective way to support strong plant growth. Brew banana peel water to provide potassium, which helps with fruit development and overall plant strength. Mix coffee grounds directly into the soil to supply nitrogen, essential for leafy growth and vibrant foliage. Eggshell water offers calcium, preventing blossom end rot on fruits like tomatoes and peppers.
For mulch, shredded autumn leaves or grass clippings serve as organic weed barriers that retain moisture and suppress weeds at no cost. Straw bales provide long-lasting coverage, protecting soil and reducing watering needs. Pine needles make an acidic mulch suitable for blueberries and other acid-loving plants. Avoid plastic sheeting, as it can harm roots; instead, use landscape fabric layered appropriately for weed control. These budget-friendly options will keep your plants healthy and thriving without overspending. When using grass clippings, apply them in small fresh layers to prevent matting and improve aeration.