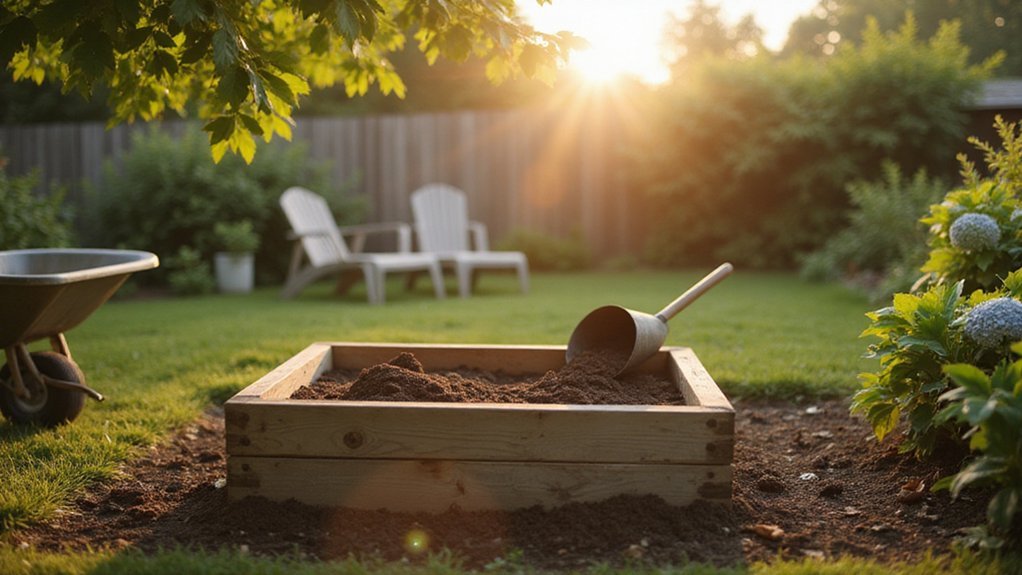
If you’re wondering how to properly fill a raised garden bed to ensure healthy plants, you’re in the right place. The right layering and materials can make a big difference in drainage, stability, and nutrient levels.
By understanding the best sequence and depth for your layers, you’ll create a thriving growing environment.
Read on for the complete steps to fill your garden bed effectively.
How to Prepare the Base Before Filling Your Raised Garden Bed
To prepare the base before filling your raised garden bed, start by clearing the site of any vegetation and leveling the ground. Remove thick grass and deep roots to prevent weeds from taking hold. Level the surface to keep your bed stable and prevent uneven soil compaction, which can affect plant growth. Mark out the desired shape using canes and string, then dig a shallow trench wide enough to accommodate your timbers to ensure a secure foundation. For long-lasting stability, choose pressure-treated lumber resistant to rot and decay.
Next, install a weed barrier at the bottom of the trench. You can lay overlapping pieces of cardboard or newspaper, making sure each edge overlaps by at least four inches. Cover this layer with two to four inches of compost to hold it down and give your bed a nutrient boost. Alternatively, you can use a weed barrier fabric secured with pins. Remove the fabric once the underlying vegetation has died back. This barrier helps prevent weeds from sprouting through the soil later, saving you time and effort. After this, add an aggregate layer for drainage and organic fill materials to complete the base setup. Using rotted logs or wood chips as a bottom fill layer is effective because they act as water sponges that hold moisture over time, improving water retention for the plants above. Keeping these logs sealed with a tight-fitting lid can prevent them from drying out too quickly. For stable temperature maintenance during hatching, consider using a proportional thermostat to regulate the heat source.
How Deep Should Your Raised Garden Bed Be?
The ideal depth for most raised garden beds is 12 to 18 inches. This range provides enough space for roots to grow robustly, especially for vegetables like tomatoes, peppers, and cucumbers. For deep-rooted crops such as carrots and potatoes, a depth of 24 to 36 inches is recommended. Keep in mind that soil compression will reduce your fill volume by about 20%, so it’s wise to add an extra 2 inches initially. A well-chosen depth enhances the success of companion planting and makes pest control easier by allowing roots to intermingle and resist stress. As a general rule, aiming for at least 12 inches offers good versatility, but 20 to 24 inches provides the maximum flexibility for a diverse range of crops. Properly maintaining humidity levels for incubation is also essential when starting seeds in a raised bed, as consistent moisture promotes healthy germination and root development. Choosing the perfect raised bed depth ensures your garden accommodates both shallow and deep-rooted crops without stress. Experts recommend that beds should be at least 6 to 8 inches tall for shallow-rooted plants, while taller raised beds provide better drainage and are easier to access for weeding and harvesting.
Why Your Raised Bed Needs Logs and Branches at the Bottom
Logs and branches placed at the bottom of a raised bed create a self-sustaining foundation that offers multiple benefits. About 6 to 12 inches of woody debris should sit beneath 12 to 16 inches of soil to optimize stability and drainage. This woody layer acts like a sponge, holding water and reducing the need for frequent watering during hot spells. As the logs slowly rot over time, they release carbon and nutrients that turn into humus, enriching your soil naturally. This process slightly increases soil acidity, which many vegetables tolerate well, supporting healthy plant growth. To prevent any anaerobic odors from developing in the woody layer, ensure adequate air circulation and avoid saturating the debris with excess moisture. Using a watering can with a fine rose attachment helps evenly moisten the woody layer without oversaturating it. For optimal results, the height of the roosting bars should be determined by considering the space available and the comfort of your birds.
Using logs instead of solely soil at the base also cuts costs significantly. For a typical 24-inch deep bed, you only need about 4 inches of topsoil layered over the woody debris. Large logs prevent shifting and compaction, creating gaps that roots can easily penetrate and encouraging healthy development. Additionally, this robust base discourages pests that prefer overly compacted or poorly drained soil, promoting a healthier garden environment over the long run. This buried wood functions as a long-term moisture storage battery during rainy periods, reducing runoff and water wastage.
What to Put in the Middle Layer of Your Raised Garden Bed
The middle layer of your raised garden bed should be rich in organic matter that gradually feeds the soil throughout the growing season. Start with a base of logs and branches to create a stable foundation. Then, layer grass clippings, leaves, and straw—these are essential compost ingredients that decompose over time. Add in partially decomposed leaf mold and aged manure to provide a nitrogen boost, balancing it out with carbon-rich materials like cardboard or newspaper strips. Incorporate kitchen scraps and coffee grounds for additional fertility, but avoid adding invasive weeds or diseased plant material. Using a food dehydrator can help dry excess herbs and vegetables from your garden for easy storage and later use.
Enhance this organic mix with soil amendments to boost nutrient levels. Mix in worm castings at around 10 to 20 percent of the total volume for microbial and nutrient benefits. Sprinkle slow-release nutrients like bone meal to support plant growth. Use peat moss or coconut coir to improve moisture retention, and small wood chips to create air pockets for proper drainage. Keep the ratio of carbon to nitrogen around 30:70 to promote healthy microbial activity, which keeps the soil balanced and fertile for the entire season. Using a stable foundation for your garden bed is just as important as choosing a sturdy base for a rain barrel to ensure long-term stability and proper function. While building your garden’s foundation, you can also consider using a pressure canner to safely preserve the harvest for long-term food storage.
What’s the Best Topsoil Blend for Healthy Plant Growth?
A good topsoil blend for healthy plant growth consists of approximately 40% screened topsoil, 40% mature compost, and 20% perlite, vermiculite, or coarse sand. This ratio provides a neutral, nutrient-rich base with excellent drainage. The topsoil should be dark, crumbly, and have a sweet smell, indicating it’s loamy and balanced. When you squeeze a handful, it should form a loose ball that easily crumbles apart, showing good structure without becoming hard or compacted. Testing your soil is essential; a home kit can confirm that your pH stays between 5.5 and 7.5 and highlight any nutrient deficiencies. To address gaps, consider adding organic amendments like biochar or rock phosphate. Keep clay content below 20% to prevent compaction and improve root penetration. This tailored blend supplies the right proportions of nitrogen, phosphorus, and potassium, giving your plants a healthy start and encouraging vigorous growth from day one. For those also raising chickens near the garden, integrating a solar heater can ensure the coop stays warm without affecting your soil’s delicate balance.
5 Money-Saving Tricks That Still Grow Great Vegetables
Buying bulk soil and compost can cut costs by up to 50%. Instead of purchasing bags, share a load with a neighbor to save money and reduce packaging waste. Using Hugelkultur, fill the bottom 6 to 12 inches of your garden bed with wood chips or rotted logs, which can reduce the amount of bagged soil needed by 30 to 40 percent. Lining the base with free cardboard blocks weeds naturally without chemicals, further reducing expenses. Source inexpensive planters from thrift stores and collect free seeds through community seed swaps. Before planting, perform soil testing to accurately assess nutrient levels—this step helps prevent unnecessary purchases and can identify early signs of pests, saving you money on treatments. Regular soil testing every 3-4 years helps monitor nutrient status and reduces the need for unnecessary fertilizers. These strategies keep your vegetable garden budget-friendly while supporting healthy, thriving plants.