Wondering how to make sure your mason jars are safe for canning? Proper sterilization is key to preventing dangerous bacteria and toxins like botulinum spores from contaminating your preserves.
In this guide, you’ll learn the best methods to sterilize jars, including how to adjust for altitude and why some methods are better than others.
Keep reading to master the safest canning practices.
Why Unsterilized Jars Risk Food Spoilage and Botulism
Unsterilized jars significantly increase the risk of food spoilage and botulism because they harbor heat-resistant microorganisms that survive processing times under 10 minutes. These microorganisms, including bacteria like Listeria and Salmonella, can cause food safety failures that aren’t visible to the eye. When jars aren’t properly sterilized, spores from these pathogens can survive and thrive as the jars cool, creating anaerobic conditions ideal for Clostridium botulinum to produce toxin. Signs of spoilage such as foaming, discoloration, or off-odors may appear, but the dangerous toxins form within 24 to 48 hours. Short processing times and unwashed jars overwhelm the heat’s ability to eliminate microbial load, making sterilization a critical step to safeguard your canned foods’ safety and shelf life. Using a raised garden bed cover can help protect produce from similar environmental contaminants. Using a properly designed and clean chicken coop helps prevent similar bacterial risks in poultry housing. Choosing high-quality wood duck nesting boxes ensures similar protection from microbial hazards in outdoor waterfowl habitats.
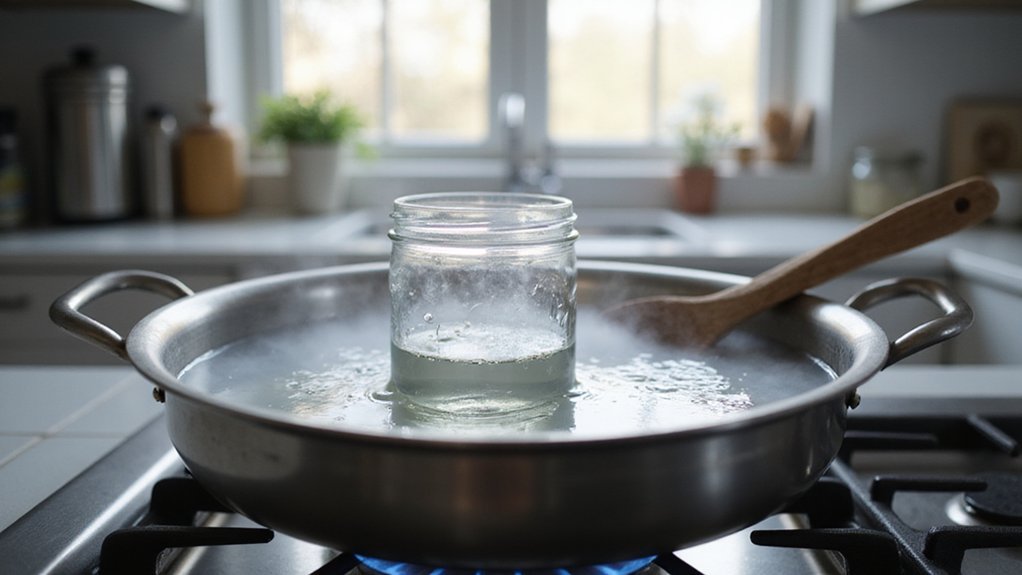
The Gold Standard: Boiling Water Sterilization for Mason Jars
Boiling water sterilization requires a large stockpot with a jar rack at the bottom to prevent jars from touching the pot directly. Fill the pot with enough water to cover the jars by at least one inch but do not exceed three-quarters full to avoid overflow during boiling. Confirm that the water level remains at least one inch above the jar tops throughout the process. Bring the water to a full, rolling boil at 100°C (212°F). Carefully submerge your jars once boiling. Start the timer only after the water returns to a boil. For elevations below 1,000 feet, boil the jars for 10 minutes. For every additional 1,000 feet of altitude, add one minute to the boiling time to ensure proper sterilization. Always keep the jar rack in place at the bottom of the stockpot to prevent the jars from cracking on the direct heat.
How to Sterilize Jars With a Steam Canner
To sterilize mason jars using a steam canner, fill the base with exactly two inches of water. This amount ensures there is enough steam to thoroughly sterilize the jars without boiling over. Place the metal rack inside the canner and bring the water to a rolling boil. Arrange the clean jars upright on the rack, with their mouths facing downward, and avoid stacking them. Maintaining space between jars allows for even steam circulation and prevents tipping.
Sterilize the jars for 20 minutes at sea level. If you are at a higher altitude, add one minute of sterilization time for every 1,000 feet above sea level. Throughout the process, keep the steam steady to ensure each jar is properly sterilized. After the time is up, turn off the heat and let the canner sit covered for five minutes. Carefully remove the jars using a jar lifter, drain any excess water, and allow the jars to air dry on a clean towel.
When You Can Skip Sterilization Entirely (Yes, Really)
You can skip sterilizing your mason jars entirely when your recipe calls for a boiling water bath processing time of 10 minutes or more. According to USDA and National Center for Home Food Preservation guidelines, jars processed for this duration are considered sterile enough, especially for high-acid foods like jams and pickles. For pressure canning, the process reaches 240°F, which sterilizes jars, lids, and everything inside. In these cases, pre-sterilizing by boiling is unnecessary. Even if you did sterilize, removing the lid from boiling water reintroduces bacteria from the kitchen environment and your hands.
To prepare jars for these processes, simply wash them in hot soapy water, rinse thoroughly, and dry. There’s no need to pre-heat or pre-boil the jars; just check for cracks, chips, or residue that might interfere with sealing or safety. Modern lids introduced since 1970 do not require heating; using them at room temperature is sufficient. This approach saves time and effort, letting you focus on sealing and recipe accuracy. Remember, if your processing time is less than 10 minutes, pre-sterilization by boiling for 10 minutes remains necessary to ensure safety.
What Happens If You Don’t Sterilize Before Processing?
Failing to sterilize jars before processing significantly increases the risk of food spoilage and foodborne illness. Without proper sterilization, bacteria, yeasts, and molds can survive and multiply in your jars, leading to cloudiness, mold growth, or foul odors. Residual spores in unsterilized jars can survive heat processing, causing spoilage and destroying the quality of your preserved food.
Most importantly, not sterilizing creates a pathway for dangerous bacteria such as Clostridium botulinum to thrive. These spores can produce a deadly toxin in the anaerobic environment of sealed jars. This toxin can cause severe symptoms like double vision, muscle weakness, or respiratory failure, and can be fatal in vulnerable populations. Skipping sterilization risks not only your food but your health, making it an essential step to ensure safety and successful preservation.
Step-by-Step: How to Sterilize Jars in a Boiling Water Canner
To sterilize jars in a boiling water canner, start by thoroughly cleaning and inspecting each jar for cracks or chips. Place the jars upright on the canner rack, ensuring the rack is level and that jars do not touch each other. Proper jar preparation helps prevent debris from entering during sterilization and ensures even heat distribution.
Next, fill the canner with enough clean water to cover the jars by 1 to 2 inches. Use hot water to speed up the heating process. Cover the canner with its lid and bring the water to a full rolling boil over high heat. When you see a vigorous boil, start your timer for 10 minutes. Keep the water boiling steadily; do not lower the heat. Once the time has elapsed, turn off the burner, tilt the lid away from you to release steam safely, and allow the jars to sit in the hot water for 5 minutes before removing. Use a jar lifter to handle the jars safely during removal.
How to Adjust Sterilization Times for Your Elevation
Because boiling temperature decreases as your elevation increases, you need to adjust your sterilization times accordingly. For water-bath canning, add 5 minutes at altitudes between 1,001 and 3,000 feet, 10 minutes at 3,001 to 6,000 feet, and 15 minutes at 6,001 to 8,000 feet. Above 8,000 feet, increase your processing time by 20 minutes. For steam sterilization, add 1 minute to your base 10-minute process for every 1,000-foot increase in elevation. Always verify water or steam temperatures with a calibrated thermometer to ensure they reach 212°F equivalents. Failing to adjust properly can result in under-sterilization, which risks spoilage of preserved goods. After processing, be sure to label each jar with the date and contents, then store your jars in cool, dark places to maximize their shelf life.
How to Handle Sterilized Jars Without Contaminating Them
Handle sterilized jars carefully to prevent contamination. Always wear clean, sanitized hands or gloves when handling jars to maintain hygiene. Use sterilized jar lifters or tongs, and remember to boil them for at least two minutes beforehand to ensure they are germ-free. Never touch the inside of the jar or its rim during handling, as this can introduce bacteria. For maximum longevity, choose jars designed for long-term food storage such as those with thick glass and airtight seals.
Place the jars on a clean drying rack or a parchment-lined baking sheet—avoid placing them on dirty counters or towels that could harbor dust or microbes. Keep the area away from raw meat prep zones to minimize the risk of cross-contamination. Once stored, stack jars only after they are completely dry and cooled to prevent any mold growth or moisture buildup. If dust or airborne debris is a concern, cover the jars with a clean cloth for extra protection.
To avoid thermal shock, fill warm jars with hot food immediately. Do not pour cold liquids into hot glass, as rapid temperature changes can cause cracks. Always inspect jars for cracks or chips before filling, and use a clean funnel to prevent spills on the rim and keep the sealing surfaces uncontaminated. Keep lids in the sterile zone until you are ready to seal the jars tightly.
Why Oven and Dishwasher Sterilization Fail (Common Mistakes)
Oven and dishwasher sterilization methods typically fail because they do not reach the necessary temperatures and conditions to safely kill all bacteria and spores in jars and lids. Ovens often create uneven heat and can cause glass jars to crack due to thermal shock or residual moisture vaporizing explosively above 275°F. Additionally, dry heat weakens jar walls over time, reducing their integrity. You cannot properly sterilize lids in an oven because rubber seals degrade above 248°F, leading to permanent failure. Dishwashers usually have sanitizing cycles that only reach around 150°F, far below the 212°F needed to effectively eliminate pathogens. Rinse aid residues can block seal integrity, and short cycle times can leave cold spots where bacteria survive. The boiling water bath remains the most reliable method, maintaining a full, submerged temperature of 212°F for at least 10 minutes to ensure safety. For a similar comparison of reliable home equipment, consider reviewing the top options for compost bins to understand which designs provide consistent heat and durability. Selecting a well-insulated compost bin protects against uneven heat distribution just as a proper boiling water bath prevents cold spots in canning. Your best bet is to stick with this proven process to keep your canned goods safe and intact.